

In this article we look at another Digital Humidity Sensor – this time its the SHT40 and we will connect it to our Microbit and see what it can do
First lets take a look at the sensor in question, this is from the datasheet
The SHT40 builds on a completely new and optimized CMOSens® chip that offers reduced power consumption and improved accuracy specifications. With the extended supply voltage range from 1.08 V to 3.6 V, it’s the perfect fit for mobile and battery-driven applications.
| Size | 1.5 x 1.5 x 0.5 mm3 |
| Output | I²C |
| Supply voltage range | 1.08 to 3.6 V |
| Energy consumption | 0.4µA (at meas. rate 1 Hz) |
| RH operating range | 0 – 100% RH |
| T operating range | -40 to +125°C (-40 to +257°F) |
| RH response time | 6 sec (tau63%) |
Here is the sensor I purchased from the good folks at Adafruit (via Pimoroni in the UK)
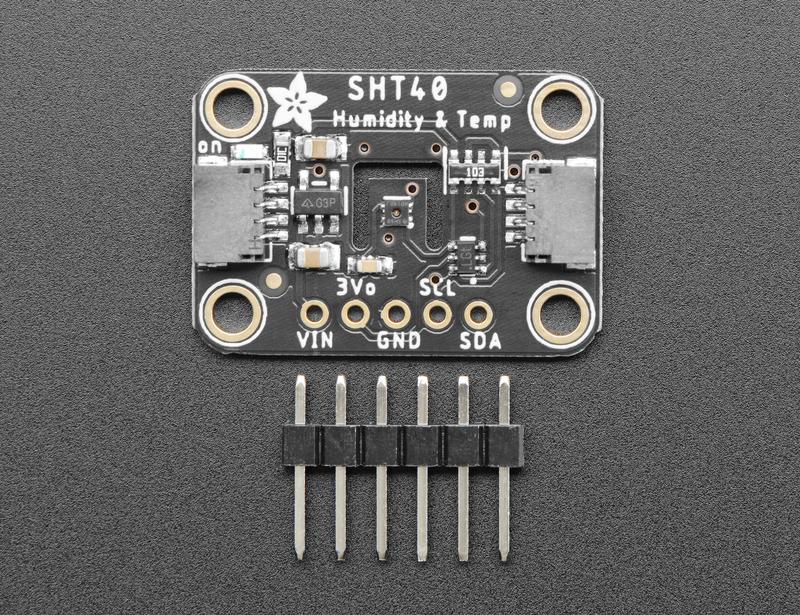
adafruit SHT40
Unlike earlier SHT sensors, this sensor has a true I2C interface for easy interfacing with only two wires (plus power and ground!).
Thanks to the voltage regulator and level shifting circuitry that Adafruit have included on the breakout it is also 3V or 5V compliant.
Parts Required
Once again for ease of use I connect an expansion board to the microbit, I feel this makes it easier to connect to a sensor like the one pictured above using connecting wire
| Name | Link |
| Microbit | Offical Microbit V2 Development Board |
| SHT40 | https://www.adafruit.com/product/4885 |
| Connecting wire | Free shipping Dupont line 120pcs 20cm male to male + male to female and female to female jumper wire |
| expansion board | micro: bit expansion board |
Schematic/Connection
The layout below shows a Microbit, I used a Microbit v1
Black for GND
Red for V+
Blue for SDA
Yellow for SCL

microbit and sht40 layout
Code Example
This example uses a couple of libraries, both of which can be installed using the library manager. if you search for the SHT40 one first and you are using a newer version of the Arduino IDE it will install the other one as well – which is useful.
You need the Adafruit library for the SHT40 – https://github.com/adafruit/Adafruit_SHT4X
You also need an I2C support library from the same folks for the library above to work and that is available from – https://github.com/adafruit/Adafruit_BusIO
This is mainly the default example
[codesyntax lang=”cpp”]
/***************************************************
  This is an example for the SHT4x Humidity & Temp Sensor

  Designed specifically to work with the SHT4x sensor from Adafruit
  ----> https://www.adafruit.com/products/4885

  These sensors use I2C to communicate, 2 pins are required to
  interface
 ****************************************************/

#include "Adafruit_SHT4x.h"

Adafruit_SHT4x sht4 = Adafruit_SHT4x();

void setup() {
  Serial.begin(115200);

  while (!Serial)
    delay(10);     // will pause Zero, Leonardo, etc until serial console opens

  Serial.println("Adafruit SHT4x test");
  if (! sht4.begin()) {
    Serial.println("Couldn't find SHT4x");
    while (1) delay(1);
  }
  Serial.println("Found SHT4x sensor");
  Serial.print("Serial number 0x");
  Serial.println(sht4.readSerial(), HEX);

  // You can have 3 different precisions, higher precision takes longer
  sht4.setPrecision(SHT4X_HIGH_PRECISION);
  switch (sht4.getPrecision()) {
     case SHT4X_HIGH_PRECISION:
       Serial.println("High precision");
       break;
     case SHT4X_MED_PRECISION:
       Serial.println("Med precision");
       break;
     case SHT4X_LOW_PRECISION:
       Serial.println("Low precision");
       break;
  }

  // You can have 6 different heater settings
  // higher heat and longer times uses more power
  // and reads will take longer too!
  sht4.setHeater(SHT4X_NO_HEATER);
  switch (sht4.getHeater()) {
     case SHT4X_NO_HEATER:
       Serial.println("No heater");
       break;
     case SHT4X_HIGH_HEATER_1S:
       Serial.println("High heat for 1 second");
       break;
     case SHT4X_HIGH_HEATER_100MS:
       Serial.println("High heat for 0.1 second");
       break;
     case SHT4X_MED_HEATER_1S:
       Serial.println("Medium heat for 1 second");
       break;
     case SHT4X_MED_HEATER_100MS:
       Serial.println("Medium heat for 0.1 second");
       break;
     case SHT4X_LOW_HEATER_1S:
       Serial.println("Low heat for 1 second");
       break;
     case SHT4X_LOW_HEATER_100MS:
       Serial.println("Low heat for 0.1 second");
       break;
  }

}


void loop() {
  sensors_event_t humidity, temp;

  uint32_t timestamp = millis();
  sht4.getEvent(&humidity, &temp);// populate temp and humidity objects with fresh data
  timestamp = millis() - timestamp;

  Serial.print("Temperature: ");
  Serial.print(temp.temperature);
  Serial.println(" degrees C");
  Serial.print("Humidity: ");
  Serial.print(humidity.relative_humidity);
  Serial.println("% rH");

  Serial.print("Read duration (ms): ");
  Serial.println(timestamp);

  delay(1000);
}
[/codesyntax]
Output
Open the serial monitor and you should see something like this
Temperature: 20.74 degrees C
Humidity: 44.26% rH
Read duration (ms): 10
Temperature: 20.75 degrees C
Humidity: 44.27% rH
Read duration (ms): 10
Temperature: 20.73 degrees C
Humidity: 44.24% rH
Read duration (ms): 10
Links
https://www.sensirion.com/en/download-center/humidity-sensors/humidity-sensor-sht4x/