

In this article we look at another barometric pressure sensor – this time its the DPS310 and we will connect it to our Microbit and see what it can do
First lets take a look at the sensor in question, this is from the datasheet
The pressure sensor element is based on a capacitive sensing principle which guarantees high precision during temperature changes. The small package makes the DPS310 ideal for mobile applications and wearable devices.
The internal signal processor converts the output from the pressure and temperature sensor elements to 24 bit results.
Each unit is individually calibrated, the calibration coefficients calculated during this process are stored in the calibration registers. The coefficients are used in the application to convert the measurement results to high accuracy pressure and temperature values.
The result FIFO can store up to 32 measurement results, allowing for a reduced host processor polling rate. Sensor measurements and calibration coefficients are available through the serial I2C or SPI interface.
The measurement status is indicated by status bits or interrupts on the SDO pin.
Features
- Supply voltage range 1.7V to 3.6V
- Operation range 300hPa – 1200hPa
- Sensor’s precision 0.002hPa
- Relative accuracy ±0.06hPa
- Pressure temperature sensitivity of 0.5Pa/K
- Temperature accuracy ±0.5C°
This is the sensor that I bought

Parts Required
Once again for ease of use I connect an expansion board to the microbit, I feel this makes it easier to connect to a sensor like the one pictured above using connecting wire
| Name | Link |
| Microbit | Offical Microbit V2 Development Board |
| DPS310 | DPS310 Precision Barometric Pressure / Altitud |
| Connecting wire | Free shipping Dupont line 120pcs 20cm male to male + male to female and female to female jumper wire |
| expansion board | micro: bit expansion board |
Schematic/Connection
The layout below shows a Microbit, I used a Microbit v1
Black for GND
Red for V+
Blue for SDA
Yellow for SCL
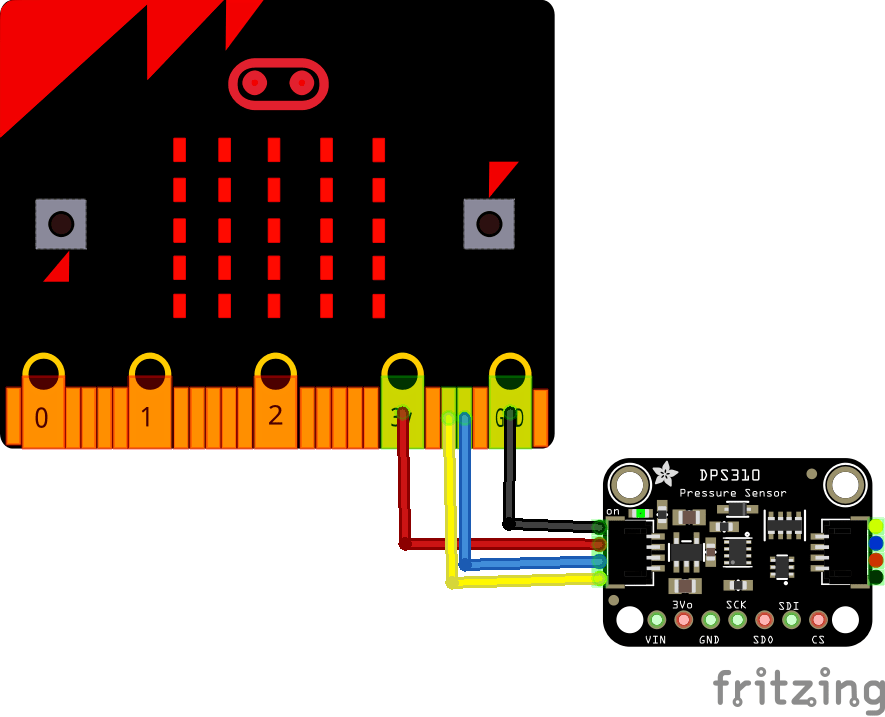
microbit and dps310 layout
Code Example
This example uses a couple of libraries, both of which can be installed using the library manager. if you search for the DPS310 one first and you are using a newer version of the Arduino IDE it will install the other one as well – which is useful.
You need the Adafruit library for the https://github.com/adafruit/Adafruit_DPS310
You also need an I2C support library from the same folks for the library above to work and that is available from – https://github.com/adafruit/Adafruit_BusIO
This is one of the simple test examples
[codesyntax lang=”cpp”]
// This example shows how to read temperature/pressure

#include <Adafruit_DPS310.h>

Adafruit_DPS310 dps;

void setup()
{
  Serial.begin(115200);
  while (!Serial) delay(10);

  Serial.println("DPS310");
  if (! dps.begin_I2C()) {             // Can pass in I2C address here
  {
    Serial.println("Failed to find DPS");
  }
    while (1) yield();
  }
  Serial.println("DPS OK!");

  dps.configurePressure(DPS310_64HZ, DPS310_64SAMPLES);
  dps.configureTemperature(DPS310_64HZ, DPS310_64SAMPLES);
}

void loop()
{
  sensors_event_t temp_event, pressure_event;

  while (!dps.temperatureAvailable() || !dps.pressureAvailable())
  {
    return; // wait until there's something to read
  }

  dps.getEvents(&temp_event, &pressure_event);
  Serial.print(F("Temperature = "));
  Serial.print(temp_event.temperature);
  Serial.println(" *C");

  Serial.print(F("Pressure = "));
  Serial.print(pressure_event.pressure);
  Serial.println(" hPa");

  Serial.println();
  delay(500);
}
[/codesyntax]
Output
Open the serial monitor and you should see something like this
TemTemperature = 21.14 *C
Pressure = 987.25 hPa
Temperature = 21.15 *C
Pressure = 987.25 hPa
Temperature = 21.15 *C
Pressure = 987.25 hPa
Temperature = 21.16 *C
Pressure = 987.25 hPa
Links