

You can now use the Arduino IDE to develop and program your Micro:Bit, in my view thats a good thing to add this support as its a popular development tool that is used for many other boards
Arduino assumes there’s a ‘softdevice’ radio already installed.
Flashing a SoftDevice
This is the instructions from https://github.com/sandeepmistry/arduino-nRF5
cd <SKETCHBOOK>, where <SKETCHBOOK> is your Arduino Sketch folder:
OS X: ~/Documents/Arduino
Linux: ~/Arduino
Windows: ~/Documents/Arduino
Create the following directories: tools/nRF5FlashSoftDevice/tool/
Download nRF5FlashSoftDevice.jar to <SKETCHBOOK>/tools/nRF5FlashSoftDevice/tool/
Restart the Arduino IDE
Select your nRF board from the Tools -> Board menu
Select a SoftDevice from the Tools -> “SoftDevice: ” menu
Select a Programmer (J-Link, ST-Link V2, or CMSIS-DAP) from the Tools -> “Programmer: ” menu
Select Tools -> nRF5 Flash SoftDevice
Read license agreement
Click “Accept” to accept license and continue, or “Decline” to decline and abort
If accepted, SoftDevice binary will be flashed to the board
or
Download this zip file, extract it and drag it into your MICROBIT drive – microbit-adv
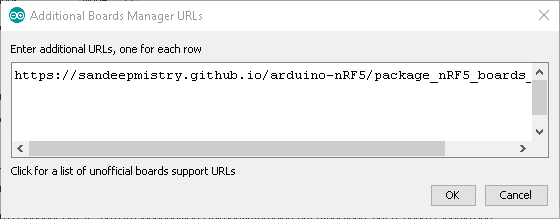
Add Arduino Support
In the Arduino IDE, go to Preferences and add https://sandeepmistry.github.io/arduino-nRF5/package_nRF5_boards_index.json into the Additional Board Manager URL text box.
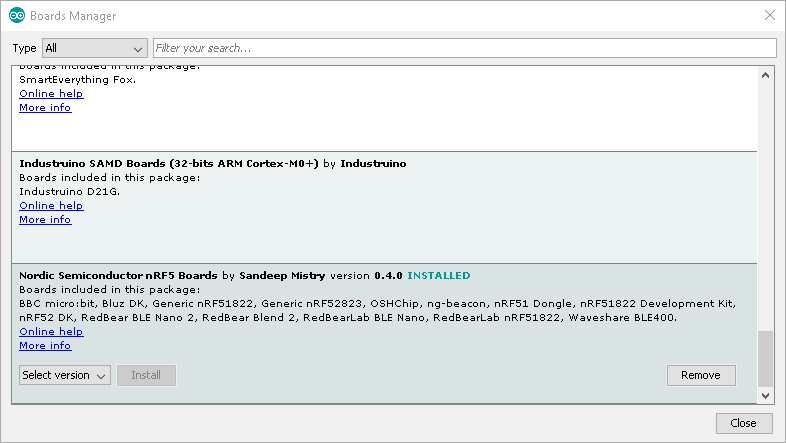
Open Tools>Board>Boards Manager from the menu bar, search for nRF5 and install “Nordic Semiconductor nRF5 Boards” by Sandeep Mistry
Select BBC micro:bit from the Boards menu
Set SoftDevice to S110
And set the Port to the microbit com port
Code
Lets play with the push buttons
You may have to increasethe delay(150), I used this to try and get rid of simple multiple presses and switch bounce
[codesyntax lang=”cpp”]
const int buttonA = 5;
const int buttonB = 11;

void setup()
{
  Serial.begin(9600);
  pinMode(buttonA, INPUT);
  pinMode(buttonB, INPUT);
}

void loop()
{
  if (! digitalRead(buttonA))
  {
    Serial.println("Button A pressed");
  }
  if (! digitalRead(buttonB))
  {
    Serial.println("Button B pressed");
  }
  delay(150);
}
[/codesyntax]
Testing
Open the serial monitor and press the buttons
Button A pressed
Button B pressed
Button A pressed
Button A pressed
Button B pressed
Button B pressed
Button B pressed
Button A pressed
Button A pressed
Button B pressed
Button B pressed
Button A pressed
Button A pressed