

The DS18B20 is a temperature sensor that can be used in various simple projects. This part uses the 1 wire (I2C) bus and you can connect multiple sensors up to your Arduino.
The part is also relatively low cost and only requires an additional 4k7 pull up resistor. In the example below we shall make a basic example that reads the temperature and outputs via serial and can be verified using the serial monitor in the Arduino IDE.
Lets look at the parts list
Parts List
| Label | Part Type |
|---|---|
| DS1 | DS18B20 1-Wire Temperature Sensor |
| Part1 | micro:bit |
| R1 | 4.7k Ω Resistor |
Layout
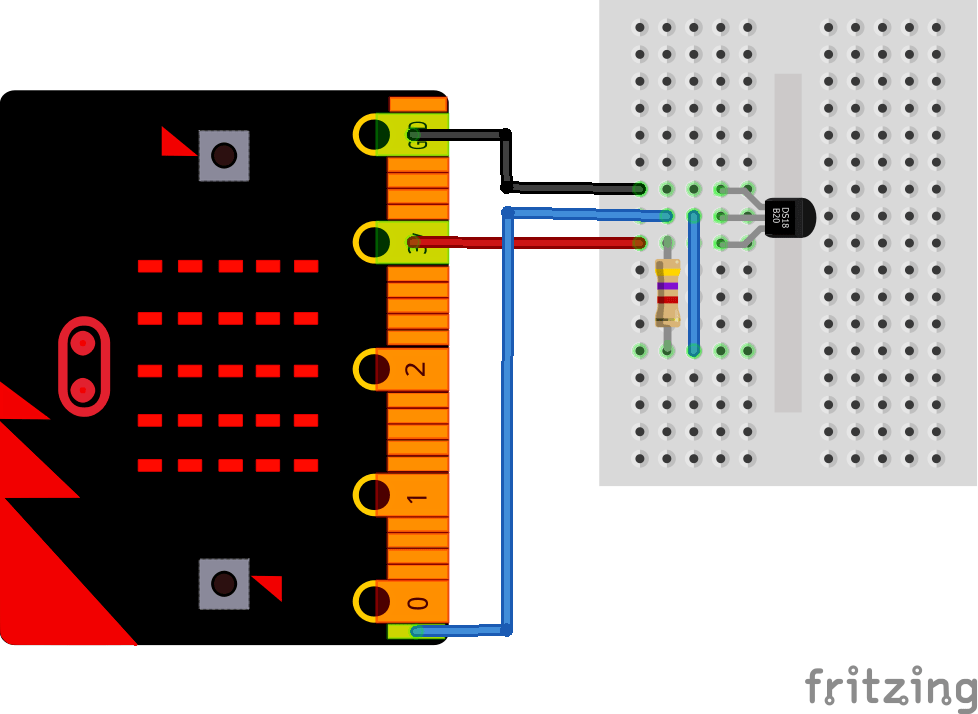
As always be careful not to get the connections incorrect, you can refer to the pinout for the device below to help . The DS18B20 can be powered by between 3.0V and 5.5V so you can simply connect its GND pin to 0V and the VDD pin to +5V from the Wemos Mini
Here is the connection diagram showing how to connect your wemos to the resistor and sensor.
Schematic
microbit and ds18b20
Code
[codesyntax lang=”cpp”]
#include <OneWire.h>

// OneWire DS18S20, DS18B20, DS1822 Temperature Example

OneWire  ds(A3);  // on pin D4 (a 4.7K resistor is necessary)

void setup(void)
{
  Serial.begin(9600);
}

void loop(void)
{
  byte i;
  byte present = 0;
  byte type_s;
  byte data[12];
  byte addr[8];
  float celsius, fahrenheit;

  if ( !ds.search(addr))
  {
    ds.reset_search();
    delay(250);
    return;
  }


  if (OneWire::crc8(addr, 7) != addr[7])
  {
      Serial.println("CRC is not valid!");
      return;
  }
  Serial.println();

  // the first ROM byte indicates which chip
  switch (addr[0])
  {
    case 0x10:
      type_s = 1;
      break;
    case 0x28:
      type_s = 0;
      break;
    case 0x22:
      type_s = 0;
      break;
    default:
      Serial.println("Device is not a DS18x20 family device.");
      return;
  }

  ds.reset();
  ds.select(addr);
  ds.write(0x44, 1);        // start conversion, with parasite power on at the end
  delay(1000);
  present = ds.reset();
  ds.select(addr);
  ds.write(0xBE);         // Read Scratchpad

  for ( i = 0; i < 9; i++)
  {
    data[i] = ds.read();
  }

  // Convert the data to actual temperature
  int16_t raw = (data[1] << 8) | data[0];
  if (type_s) {
    raw = raw << 3; // 9 bit resolution default
    if (data[7] == 0x10)
    {
      raw = (raw & 0xFFF0) + 12 - data[6];
    }
  }
  else
  {
    byte cfg = (data[4] & 0x60);
    if (cfg == 0x00) raw = raw & ~7;  // 9 bit resolution, 93.75 ms
    else if (cfg == 0x20) raw = raw & ~3; // 10 bit res, 187.5 ms
    else if (cfg == 0x40) raw = raw & ~1; // 11 bit res, 375 ms

  }
  celsius = (float)raw / 16.0;
  fahrenheit = celsius * 1.8 + 32.0;
  Serial.print("  Temperature = ");
  Serial.print(celsius);
  Serial.print(" Celsius, ");
  Serial.print(fahrenheit);
  Serial.println(" Fahrenheit");
}
[/codesyntax]
Output
Open the serial monitor and you should see something like this
Temperature = 19.44 Celsius, 66.99 Fahrenheit
Temperature = 20.37 Celsius, 68.68 Fahrenheit
Temperature = 22.75 Celsius, 72.95 Fahrenheit
Temperature = 24.50 Celsius, 76.10 Fahrenheit
Temperature = 25.75 Celsius, 78.35 Fahrenheit
Temperature = 26.81 Celsius, 80.26 Fahrenheit
Temperature = 27.62 Celsius, 81.72 Fahrenheit
Links
1PCS DS18B20 temperature measurement sensor module For arduino